PROJECT: ClassRepo
Introduction
This portfolio is meant to document the contributions that I made to this project. This project serves as the platform for undergraduates to apply software engineering principles as part of the module CS2113T provided by the National University of Singapore (NUS). ClassRepo was headed by 5 developers, including myself.
Overview
ClassRepo is a desktop Java application designed for secondary school students, tutors and staff. It aims to integrate all the functionalities that each user may require during their time in school.
Functionalities include organising of person data, exams, grades, attendance and fees. Also, a feature to restrict users based on user type is also implemented.
With the above, this application achieves its goal of increasing efficiency data handling and improving the ease of access to information.
Roles
Under this project, I serve as the Project Lead, monitoring the merger of Pull Requests and ensuring the master branch is clean and free of bugs. I also took it upon myself to set up the project’s environment (tools and improved codebase), so that the other team members have an easier time developing this product.
Summary of contributions
Code Contributed
Available here
Main feature implemented:
Privilege and Account Features
-
What it does: The privilege feature restricts available user interactions based on what privilege level they are currently hold. In addition, the account feature allow users to authenticate themselves and raise their privilege level so as to access more commands.
-
Justification: This feature helps fufil the requirement of having different types of user interacting with the system. Thus, setting up the structure within the system by giving access only to the commands the user will need.
-
Highlights: This feature weaves itself into all the commands implemented, which demands careful modification to each of them as to ensure no bugs arise from regression.
Other contributions:
-
Project management:
-
In charge of merging pull requests and ensuring passing builds in master branch
-
Managed releases
v1.2.1,v1.3,v1.3.1andv1.4(4 releases) on GitHub -
Set up several Dev Ops application
-
Gradle (Build Automaton adapted from AB4)
-
Travis (Continuous Integration)
-
Coveralls (Code Coverage)
-
Codacy (Code Quality)
-
GitHub Pages (Auto-publishing)
-
-
Updated code of AddressBook-3 to fulfil the Learning Outcomes expected, to provide a good base to start the project on.
-
Set up labels and milestones on issue tracker
-
Programed a "Command usage to adoc format convertor", available at this link
-
-
Enhancements to existing features:
-
Updated the GUI
-
Added a status console to display status messages
-
Designed Koro-san
 , our mascot which serves as our Java application icon.
-
-
-
Community:
-
Documentation:
-
Did cosmetic tweaks
-
Added table of content
-
Made Appendices collapsible
-
Designed icons


 for easier identification of privilege required for commands
-
-
Contributions to the User Guide
Given below are sections I contributed to the User Guide. They showcase my ability to write documentation targeting end-users. |
Privilege Commands
Below are the commands that deals with privilege:
Raises your privilege level : raise 
Raises the privilege level to Admin. Requires the master password.
Format: raise PASSWORD
|
The default master password when first deploying ClassRepo is |
Example(s):
-
raise default_pw
Raises your privilege level to Admin.
See your privilege level : viewpri 
Displays your current privilege level as well as the account you are logged in as
Format: viewpri
Change the master password : editpw 
Changes the master password. Requires the current master password and Admin privileges.
Format: editpw OLD_PASSWORD NEW_PASSWORD
|
It is recommended to change the master password when first deploying ClassRepo. |
Example(s):
-
editpw default_pw new_pw
Changes the master password to "new_pw".
Sets default privilege : perm 
Sets/Unsets the privilege to be Admin when starting a new session.
Format: perm BOOLEAN
|
This is recommended to be only done on machines that you are certain only administrators of your school have access to. |
Example(s):
-
raise default_pw
perm true
Sets the default privilege when starting a session to be Admin. -
raise default_pw
perm false
Sets the default privilege when starting a session to be Basic.
Account Commands
Below are the commands that deal with accounts:
Add an account to a person: addacc 
Adds an account to the target person.
Format: addacc INDEX USERNAME PASSWORD PRIVILEGE_LEVEL
|
PRIVILEGE_LEVEL can be of type "Basic", "Tutor" or "Admin". |
Example(s):
-
list
addacc 1 JohnDoe1337 P455W0RD Admin
Adds an account with the username ofJohnDoe1337, password ofP455W0RDand privilege level ofAdminto the first person in the list.
Delete the account of a person: deleteacc 
Deletes the account of the target person.
Format: deleteacc INDEX
Example(s):
-
list
deleteacc 1
Deletes the account of the first person in the list, provided that he has an account.
Login to an account: login 
Log in to the account with the specified username and password.
Format: login USERNAME PASSWORD
Example(s):
-
login JohnDoe1337 P455W0RD
Login an account with the username ofJohnDoe1337and password ofP455W0RD, provided it exists.
|
Executing |
Logout of an account: logout 
Logout of the current account.
Format: logout
Example(s):
-
logout
Logs out of the current account, provided there is privilege or account to relinquish.
Displays the list of people with account: listacc 
Shows a list of all persons with an account in the address book, showing only names and user type.
Format: listacc
Contributions to the Developer Guide
Given below are sections I contributed to the Developer Guide. They showcase my ability to write technical documentation and the technical depth of my contributions to the project. |
Privilege/Account Feature
The Privilege feature aims to only restrict the user’s interaction to their allowed commands, while the Account feature provides a means for the user to authenticate himself/herself to access more commands.
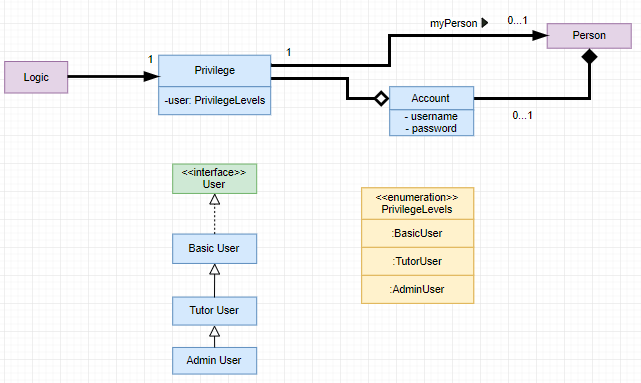
The figure below shows the class diagram describing the implementation of the Privilege/Account feature.

Current Implementation
-
Logic is assigned to one Privilege object at all times. Privilege contains a User (specified by the PrivilegeLevel enum) and a Person (referred to as
myPerson). -
The User interface describes the different Privilege level an user can have, which is implemented by BasicUser, TutorUser and AdminUser.
-
BasicUser is the class with the lowest access level, and the ancestor to other 2 User classes.
-
To create an increasing level of access, each User of a higher level inherits from the successively lower one.
-
User levels have their own list of new commands they can run, which is appended to the list inherited from their parent.
-
Account class, which contains its respective Privilege object as well as login details, assigns a Privilege level to a Person.
An example of how logging into an account works:
-
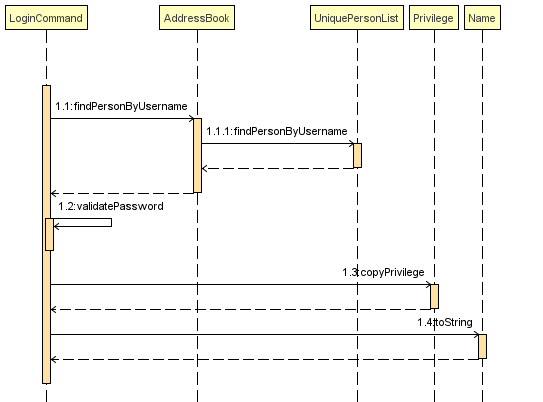
First, the Command will retrieve the Person with the specified username, which is gotten from AddressBook who receives it from UniquePersonList.
-
The Command then validates that the specified password matches the password the Account belonging to the retrieved person.
-
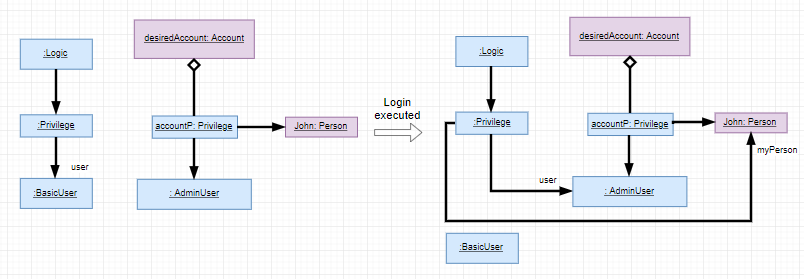
If the password is correct, the Command will update the Privilege level(
user) and its Person(myPerson) to match that of the Account. -
Finally, the Command retrieve the Name of the Person in a string format to be printed as part of the feedback message.
Step 3 is illustrated in the Object Diagram below.

The Sequence Diagram below gives an overview of the process involved in logging into an Account

Design Considerations
Aspect: How to define a privilege level of Privilege
-
Alternative 1 (current choice): Instantiate User objects of the different access level. Privilege contains an enum UserType which point to each of these instantiated objects.
-
Pros: Allow us to make use of inheritance to organize the list (higher access level User’s list of allowed Commands will always be a superset of that of a lower access level).
The usage of enums also allows us to keep a reference to the created User object, which allows us to point back to these object if need be, rather than having to instantiate new ones each time. -
Cons: Requires the use of User class to represent the different access levels
-
-
Alternative 2: Use an enum to indicate the current access level. List of allowed Commands will be generated base on the value of this enum.
-
Pros: Does not require a separate class to represent the different Privilege levels.
-
Cons: Difficult to maintain the list of allowed Commands.
-
-
Alternative 3: Use a String to determine the Privilege level.
-
Pros: Easy to implement and parse.
-
Cons: Very prone to undetected bugs, like misspelling the Privilege levels.
-
Aspect: How to define the required Privilege level of Commands
-
Alternative 1 (current choice): Each User holds a list of Commands they can run
-
Pros: Easy to maintain the list of available Commands for a given User.
-
Cons: Difficult to find the required Privilege level a Command, as it requires looping through the list to find the presence of the given Command.
-
-
Alternative 2: Each Command knows what access level is required to run it
-
Pros: Easy to find what access level a Command requires
-
Cons: Difficult to see the Commands available to a given User can run, thus making it hard to organize the Commands by their required access level.
-
-
Alternative 3: Have both 1 and 2
-
Pros: Doing both the above operations become easy
-
Cons: Difficult to maintain both information. The required Privilege level for Commands will be stored in 2 separate locations and needs to be in sync.
-
Aspect: How to update the Privilege of Logic when logging into an Account
-
Alternative 1 (current choice): The Privilege object attached to Logic will copy the User and the Person attached to the given Account object, into its own variables.
-
Pros: Does not require the Command to interact with Logic, thus reducing coupling.
-
Cons: A bit more awkward solution than the Alternative 2
-
-
Alternative 2: Make Logic’s variable to point to the new Privilege object inside of Account.
-
Pros: Quick to implement.
-
Cons: Has a higher level of coupling compared to Alternative 1. Also, would require storing or instantiating a default Privilege object and making a Logic point to this new object if Logout Command were to be called.
-
Aspect: Default required access levels for Commands
-
Alternative 1 (current choice): Required Privilege level is set to Admin by default
-
Pros: If a developer forgets to assign a required Privilege level to a Command, it will to still be functional.
-
Cons: May mask the fact that the Command has the unintended access level of Admin, which is a minor drawback.
-
-
Alternative 2: Enforce all Commands to be assigned an access level
-
Pros: Forces developers to be deliberate with their access level assigned to Commands.
-
Cons: Program will fail to integrate if any of the developers forgot to assign an access level to their newly developed Command.
-
Aspect: Who throws InsufficientPrivilege Exception
-
Alternative 1 (current choice): Logic throws the Exception
-
Pros: It is a common starting point of commands, so it is easy to implement it to throw the Exception
-
Cons: Blurs the responsibility of Commands being the one throwing Exceptions
-
-
Alternative 2: Each Command checks the Privilege level during execute()
-
Pros: Keeps to the responsibility of Commands being the one to throw the Exception.
-
Cons: Requires backdating all Commands to include this function in their execute(). Also prone to errors as a developer may forget to call this function in their execute() of their newly developed Command.
-
-
Alternative 3: Have a function that checks the Privilege level in parent command that is called during execute()
-
Pros: Same as Alternative 2.
-
Cons: Same as Alternative 2, but instead of using individual functions, we are repeatedly using the inherited function instead
-